Working with Git in a team#
In this section we are going to see what it looks like to collaborate with others on gitHub projects. Up to now you were working with git alone using this workflow:
Modify a file --> Add --> Commit --> Push
So every time you run git push, git will compare the files in the remote repository with the version you are pushing and update everything. But when working with other people there are instances that can potentially create merge conflicts. While the name suggest otherwise a merge conflict is not necessarily an error, it happens when the version of a file on the local repo is not compatible with its version on the remote repo. Sometimes, Git is able to combine the two sets of changes without any trouble. But sometimes it gets stuck, and requires a human to intervene and decide how multiple changes should be combined, do you keep version A, version B or a combination of both?
Identifying merge conflicts#
Imagine a colleague added a new line in read_era5.py to import the numpy package. The file looks like this:
import xarray as xr
import matplotlib.pyplot as plt
import numpy

# Load a NetCDF climate dataset
ds = xr.open_mfdataset("era5_data.nc")
print(ds)
At the same time, you also added this line but decided that import numpy as np is the right way to go. When you commit and push the new version of the file to the remote repository you get this message:
Auto-merging read_era5.py
CONFLICT (content): Merge conflict in read_era5.py
Automatic merge failed; fix conflicts and then commit the result.
The message says that there are conflicts withe the content of read_era5.py and that the automatic merge failed. The good news is that we now which file is the issue. Here, doing small commits with small changes helps a lot.
Now, if you come back to read_era5.py, the content has changed:
import xarray as xr
import matplotlib.pyplot as plt
<<<<<<< HEAD
import numpy as np
=======
import numpy
>>>>>>> 318548cbe665e65b4dae4a5da8d4eba187a4c6b2

# Load a NetCDF climate dataset
ds = xr.open_mfdataset("era5_data.nc")
print(ds)
The funny additions <<<<<<<, ======= and >>>>>>> were added by git to highlight the merge conflict. Everything between <<<<<<< HEAD and ======= correspond to the local version, and the content between ======= and >>>>>>> is the version currently on GitHub. The long string is the commit id.
If you are using git from the terminal, you can edit this file, remove the arrows and keep the version you prefer. Some GUIs and visual interfaces will let you choose the version you want to keep and take care of editing the file, for example check this short video to see how to solve a merge conflict form an ARE session using the jupyter git extension.
Thi can also happen if you changed something on GitHub, forgot to run git pull locally and changed the same file. While merge conflicts comes with git, we’ll try to avoid them as much as possible.
1. Pull first#
It is a good idea to run git pull before you start to work with the files in a repository, this way you will start working with the most current version of the repository.
2. People work on different files#
The easiest way to avoid merge conflicts is to tell people to work in different files and to not edit other’s people files. This work.
In the long run you may need to work on someone else code and for those situations communication between team members is key.
3. People takes turns#
Maybe more than one person is working on the same file, it could be a script or maybe is documentation. That usually will be a job for many people. One solution is to take turns, you work on the file during the morning, your colleague works on it during the afternoon.
4. People work on branches#
Here is when the things get interesting and a little more complicated, but we are taking fully advantage of what git has to offer.
Branches may be a new concept but actually, you are always working on a branch without noticing. The “default” branch is usually called main because it is the principal, so you were “adding commit to the main” all this time. A branch in git is a tag that points to a specific commit in the repository from which other versions of the repository are created. Working in a branch allows you to modify files without modifying the same files in other branches, because essentially you are working on a “parallel” set of files. When you want to pass the changes from your branch to the main branch, you would have to do a merge to combine the branches.
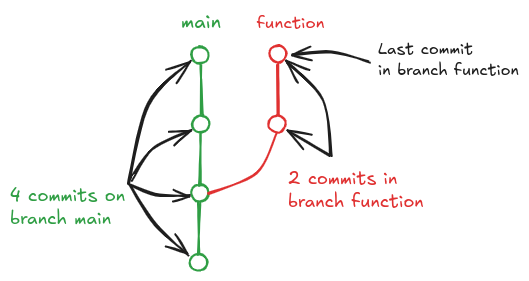
Fig. 4 Git tree.#
There are different ways to use branches. Maybe every person in the team has one branch and work on that branch until is time to merge everything to the main. Or maybe, and this is more common, each branch represent a new feature added to the project. So if you are adding a new function, you create a branch, develop the code and them merge it.
Working with branches won’t eliminate merge conflicts, but those will appear once when you merge your branch to the main and will prepare to deal with it.
Before we revise how the workflow looks like in this case, there is one new concept we need to mention: a Pull Request or PR is a GitHub tool that allows you to make changes to a branch and then request to the repo owner or maintainer to merge those changes into the main branch. Pull requests can come from forks (will talk about that later) or from independent branches within the repository. They allow the maintainers and contributors to the project to review, discuss, request, and approve the changes and merge then to the main branch.
Collaborative workflow 1#
This diagram shows the workflow when you what to contribute to the repository using branches. Here we assume you have write permissions on the remote repository,
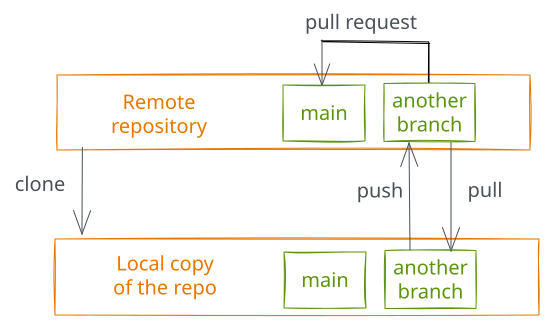
Fig. 5 Collaborative workflow without a fork.#
Clone the repository on your computer.
Create a new branch.
Edit files, add them and make commits in that branch.
When the changes are done and ready, send a pull request to the remote repository to compare your changes in your branch with main branch.
The pull request is accepted and merged or you have to make new changes (go back to step 3).
Once the PR is accepted and merged, the main branch now has the updated changes and you can delete the branch you were working on.
The process can be repeated several times, in parallel or in sequence depending on the size of the team and project.
Let’s try this with a exercise:
Exercise
Choose a repo, it can be a repo you own or, even better, someone else repo where you are a collaborator. You will need the URL (remember we use SSH option)
We’ll assume you are working with this repo from now on.
On the terminal, run
git clone <repo URL>. You need to make sure you are in the right folder.Create a new branch with
git checkout -b suggest-plot, it will automatically switch to the new branch.Edit o create a new file. For example, add the necessary code to plot the data in
read_era5.py:
 import xarray as xr
+import matplotlib.pyplot as plt

 # Load a NetCDF climate dataset
 ds = xr.open_mfdataset("era5_data.nc")
 print(ds)
+
+# Plot a temperature time series
+plt.plot(df["date"], df["temperature"])
+plt.xlabel("Date")
+plt.ylabel("Temperature")
+plt.title("Temperature Over Time")
+plt.show()
here the
+at the beginning of a line means that we are adding it (or modifying it) to the file. The opposite will be true if we see a-. The above results is wahtgit diff read_era5.pyreturns after to modify the script.
With
git statusyou can check where you are:
On branch suggest-plot
Changes not staged for commit:
  (use "git add <file>..." to update what will be committed)
  (use "git restore <file>..." to discard changes in working directory)
	modified:   read_era5.py

no changes added to commit (use "git add" and/or "git commit -a")
Add and commit the file as usual and send the new version to GitHub with a push. You will get something like this:
Enumerating objects: 5, done.
Counting objects: 100% (5/5), done.
Delta compression using up to 20 threads
Compressing objects: 100% (3/3), done.
Writing objects: 100% (3/3), 468 bytes | 468.00 KiB/s, done.
Total 3 (delta 0), reused 0 (delta 0), pack-reused 0 (from 0)
remote:
remote: Create a pull request for 'suggest-plot' on GitHub by visiting:
remote:      https://github.com/<username>/new-project/pull/new/suggest-plot
remote:
To github.com:<username>/new-project.git
 * [new branch]      suggest-plot -> suggest-plot
branch 'suggest-plot' set up to track 'origin/suggest-plot'.
To open a pull request you need to go the repo on GitHub. You will see a big “Compare & pull request” green button. Click on that!

GitHub will compare main and suggest-plot branches to see if the proposed changes are compatible. In this step you will need to add a title and a message to open the PR.
And that’s it. The maintainer of the repo with get an email and with time, revise and hopefully accept your contribution.
Here is a list of the new commands you just used:
Commands
git clone <repo URL>to clone a repository, independently of if is yours or not. This command will download the repository in the folder you are in the terminal.git checkout -b <name>will create a new branch.git checkout <name>will move you to a different branch.
Collaborative workflow 2#
If you do not have write permissions on the remote repository, so you will need to use forks. This is very common when you want to collaborate with project that you are not part of.
A fork is a copy of another person’s or team’s repository that will be stored in your GitHub account. Both the original and the fork are on GitHub, the difference is that you can modify and update the version that lives in your account.
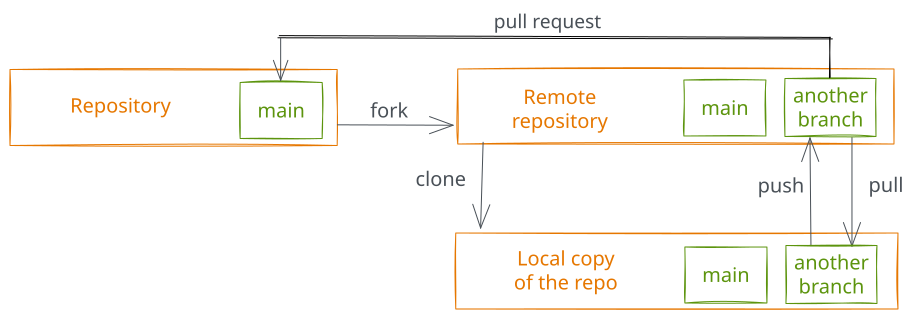
Fig. 6 Collaborative workflow with a fork.#
Create a fork of the main repository.
Clone the forked repository on your computer.
Create a new branch in the forked repository.
Make changes to the files and commit them to the branch.
When everything is ready, open the pull request. If you need to make new changes you will have to go back to step 4.
If the PR is accepted and merged, the main branch in the main repository will be updated and the new branch can be deleted.
Finally you can synchronize your forked repository with the main repository.
Let’s go through the workflow with a exercise.
Exercise
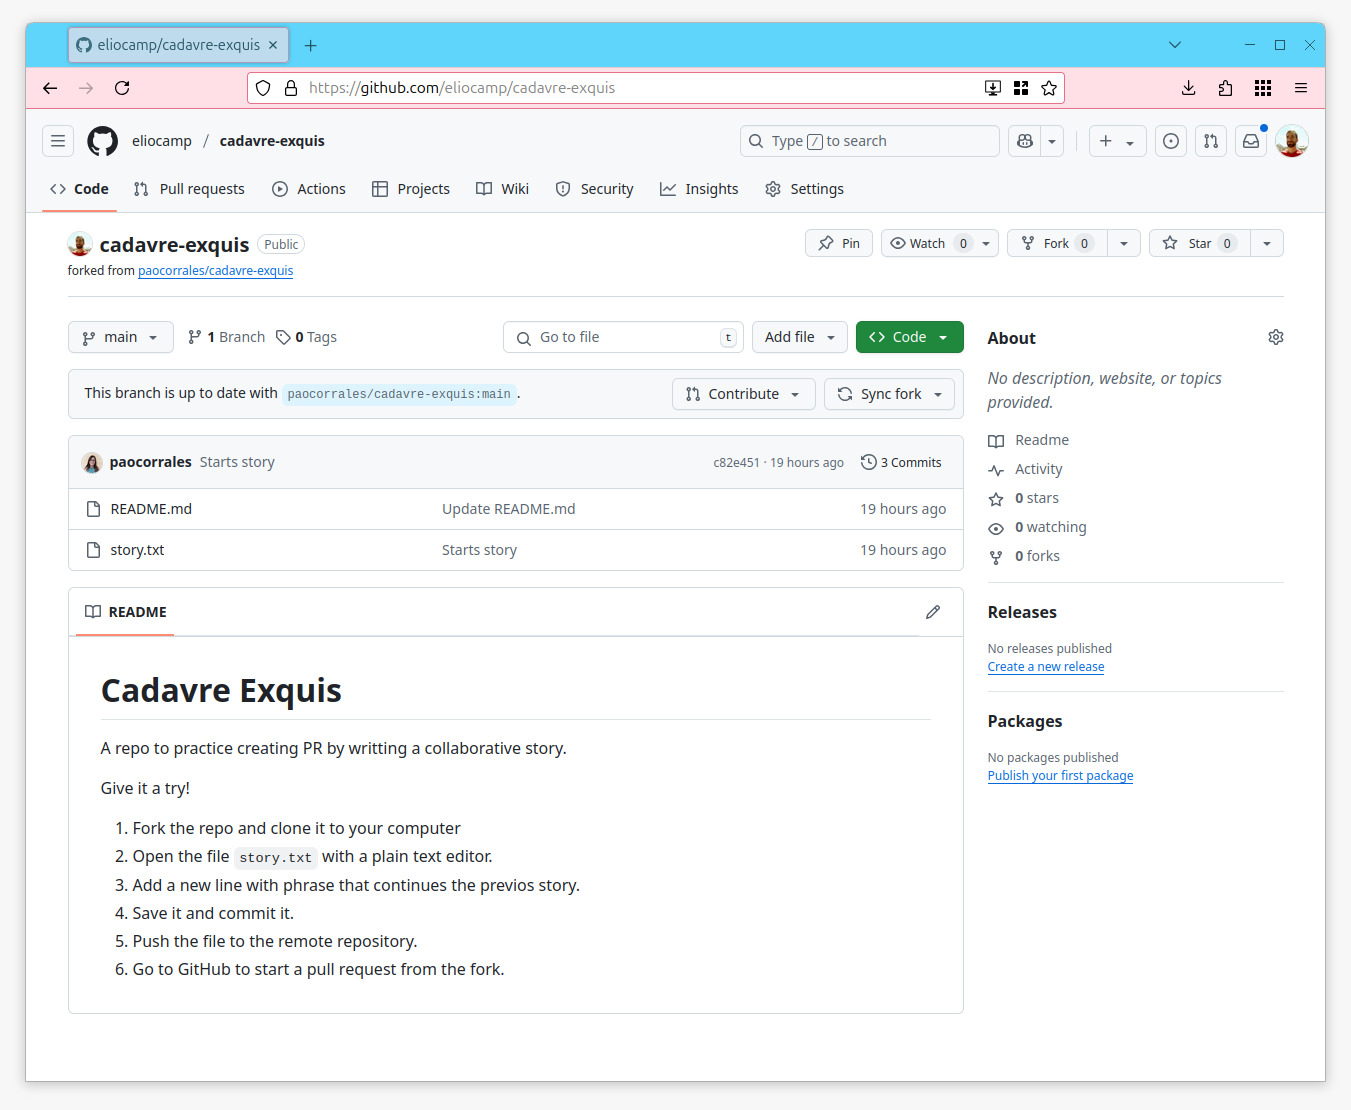
In this second scenario we assume you don’t have write permission in the repo you want to collaborate. For example, you may want to collaborate with this cadavre exquis! The idea is to add a new sentence to the story here.
Fork the repository using the “Fork” button on the top right corner. This will create a copy of the repo into your GitHub account.
Copy the url of the repo and clone it to your computer. On the terminal, run
git clone <repo URL>. Remember to use the SSH option.
The repo is very small, it only have a README and a text file called story.txt. So, in this cadavre exquis, each collaborator adds a phrase to the story in a new line. The new phrase needs to be some how connected with the previous.
Open the
story.txtfile and add a phrase.Save the file, create a commit and push it to your repo.
Push it to your remote repository.
Now, if you go to the remote repo on GitHub, you will see something like this::
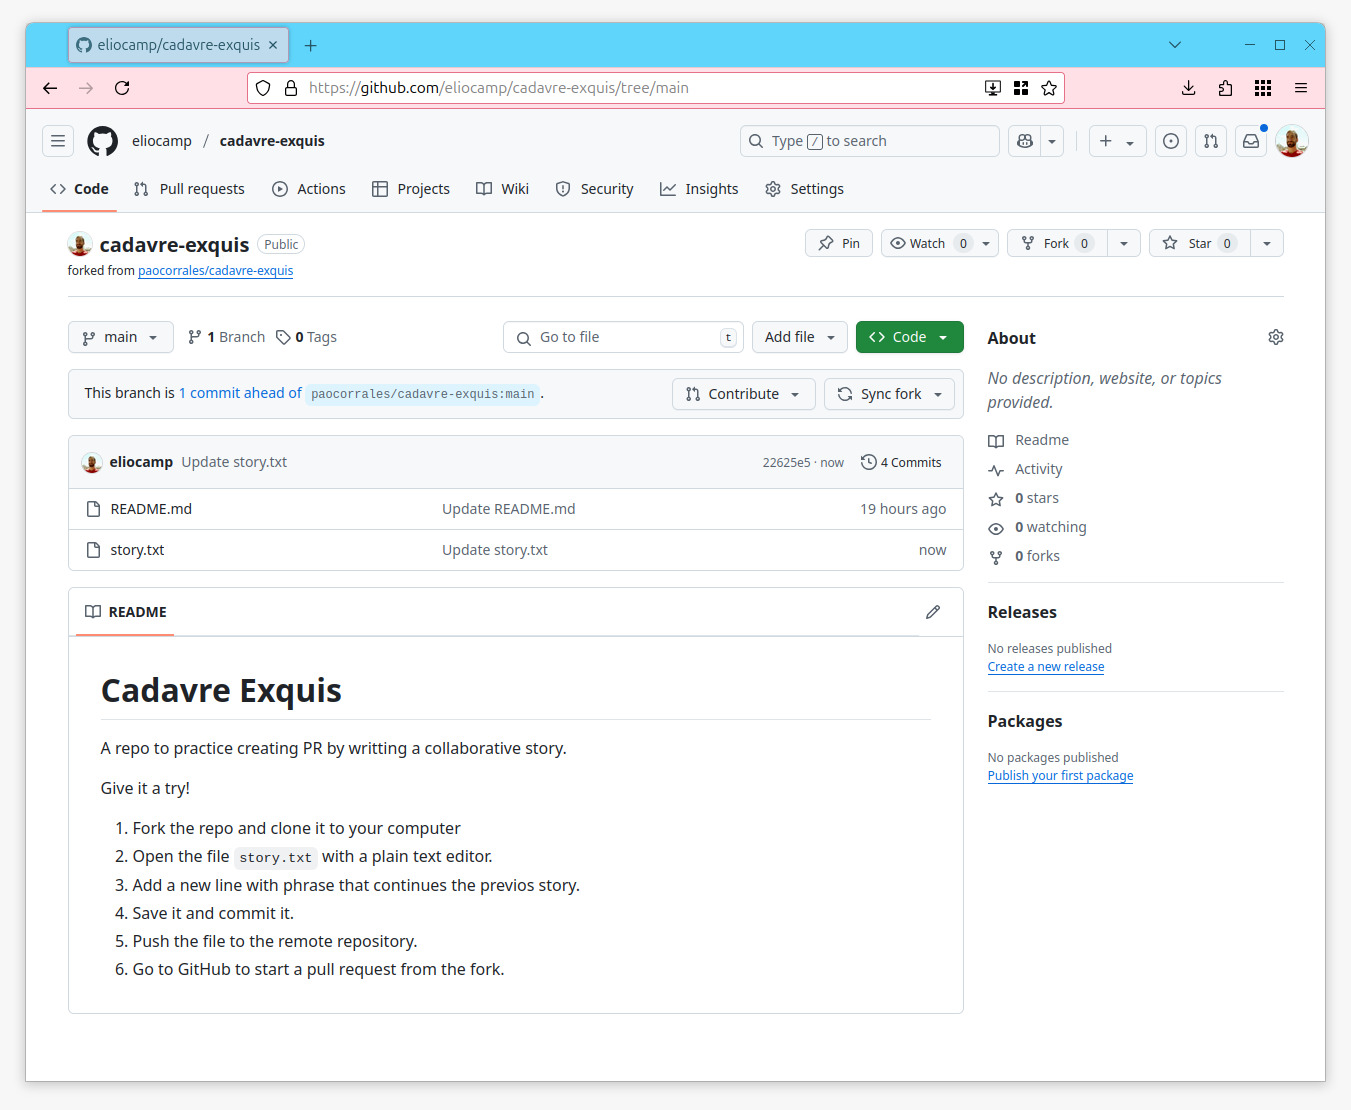
Click on “Contribute”.
And click on “Create pull request”.
We are almost there. Complete the pull request with a title and a message and then finish the PR
And that’s it! The owner/s of the repo will receive an email. They can review the pull request, comment on it and eventually accept the contribution. When that happen the changes you made will appear in the rep
Tip
If you prefer or need to do everything from the terminal, including forks and PR, GitHub has a command line called gh.
So, for example if you what to create a PR, from the terminal run:
gh pr create --title "Pull request title" --body "Pull request body"
Adding a title and a message in the body of the pull request. The Terminal will return the link to the pr in the web. It’s useful to remember the number.
You can also add comments after opening the pull request with:
gh pr comment <number of pr> --body "Some comment"