Working with Git alone#
It is a good idea to start using git in a project were your are working alone, that way you can practice the workflow without worrying about others’ people work.
How version control works?#
Let’s imagine that we have a repository already working (later we’ll see how to create one).
When you create a new file as part of the repository (or repo), that file is untracked or unversioned.
This means that git will ignore the file and any change you make to it until you add it to the repo.
At that point the file is staged, meaning the changes in the file are ready to get into the repository.
To do that you do a commit and save that version of the file to the repo with a message that explain what’s the commit about.
This workflow modify --> add --> commit will repeat every time you want to save a version of the file.
We don’t recommend making a commit every time you save the file or change a comma, and its also not a good idea to make a commit with a billion of changes.
With practice and depending on how do you work, you will find a comfortable middle ground.
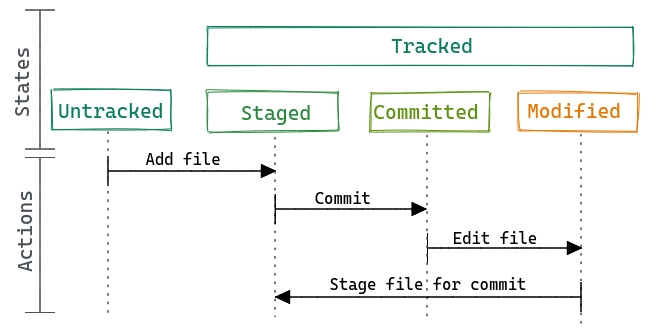
Fig. 1 States of a file in a repository.#
Note
Once you’ve made a commit, it’s set in stone:
the files in it never change,
its diff (the difference between the old and new version of the file) never changes,
its history never changes
the message and author never change
If you have experience working with the command line you could use git from there. When working locally in your laptop you can use the command line or use a GUI like GitHub Desktop or GitKraken. RStudio and VSCode also provides a basic GUI for git that you can use.
So, we mentioned add and commit a lot, these are the git commands you will use all the time as part of the git workflow. Here is the way to use them:
Commands
git add <file>to add a file to the staging area.git commit -m "A very descriptive messageto commit the files on the staging area.
What are remote repositories?#
What we explained before is the local workflow. This is when the repo lives in your computer (or in Gadi) and that’s it. But you can also connect the local repository with a remote repository. Here we are going to use GitHub to host remote repositories, but there are other options you can explore, such as GitLab.
Let’s imagine we have a local repository, we made some commits and we want to send those changes to the remote repository (we’ll how to create the remote repository later).
For that we push the commits to the remote repository and the two repos are “up to date”. This will work if the local and the remote repository are connected and you have the correct permissions., we’ll talk about that in a little bit
If a team-mate changes a file and pushes the changes it to the remote repository (your maybe is your from a different computer), your local repo will be outdated.
To download those new commits from the remote repository into the local repo you pull the commits.
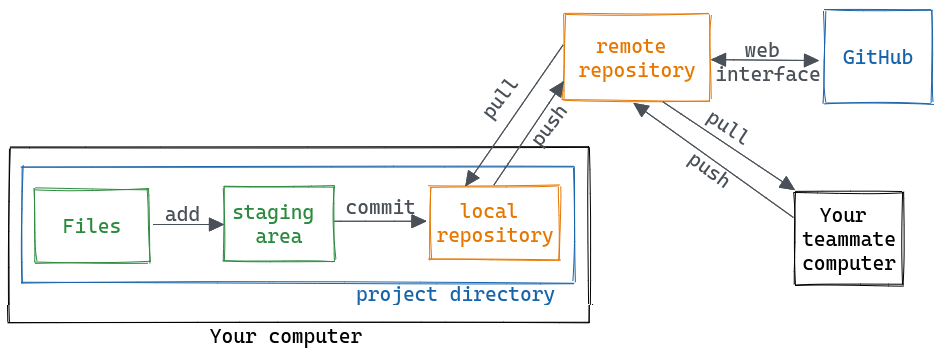
Fig. 2 Git workflow.#
Tools like GitHub also include features that help you to collaborate and manage repositories. For example, you can modify files and commit those changes using the web interface.
Commands
git pushto upload commits to the remote repository.git pullto download commits from the remote repository to the local repo.
Creating a local new repository#
There are many ways to start a new repository, locally in your computer using the command line or an interface, from GitHub or from any GUI! Here we’ll show you how to create a repo from the terminal, associate it to a GitHub repo and work with it. But keep in mind that there are many other ways to work with git.
Exercise
Create a local repository
Create the folder for the repo, for example
$ mkdir new-project
$ cd new-project
Initialise the repo
$ git init
Now, the folder new-project/ is a repository. Inf you run ls -a, you will see that the folder is not empty, there is a new hidden folder called .git. This folder will store all the information about the repository, including the tracked files. If you delete the folder, you lose the project’s history.
Local changes#
It’s time to put into practice some of the thing we’ve been talking about.
Let’s first check the status of the repo with:
Commands
git statustells you the status of the project.
This command will also list the changes and the options you have on what to do with those changes. If you run git status you will get this message
On branch main

No commits yet

nothing to commit (create/copy files and use "git add" to track)
Now is time to create a new file. Let’s create read_era5.py, it can be an empty file for now.
If you run git status again, the message changes to:
On branch main

No commits yet

Untracked files:
  (use "git add <file>..." to include in what will be committed)
	read_era5.py

nothing added to commit but untracked files present (use "git add" to track)
…and is already telling you what to do next at the end: (use "git add" to track).
Exercise
Add the file to the repository
Use
addto stage the file
If we check the repo status again, we get:
On branch main

No commits yet

Changes to be committed:
  (use "git rm --cached <file>..." to unstage)
	new file:   read_era5.py
Now the read_era5.py file is ready to be commited to the repo.
Exercise
Commit the file to the repository
Use
git commit -m <"message">to stage the file
We use the -m flag (for “message”) to record a short and descriptive comment that will help us remember later on what we did and why. Your future you (and your colleges) will thank you later.
And again, git status returns:
On branch main
nothing to commit, working tree clean
Next time you change something in read_era5.py and wants to add it to the repo, you need to follow the same steps.
Exercise
Practice the workflow
Modify
read_era5.pyto include the imported libraries.Use
addto stage the fileUse
git commit -m <"message">to stage the file
It is not always necessary but you can check the status of the repo in between the steps.
Creating the remote repository#
Let’s create the remote repository that we’ll associated with the one we just created.
Exercise
Create the remote repo on GitHub
Go to github.com and log in.
On the top right corner, click on the “+” bottom and then “New repository”
Then complete the fields:
Repository template: No template.
Repository name: new-project or whatever you wish to name your new project.
Description: Any short description of the project. Write this for humans.
Public.
Initialize this repository with: nothing
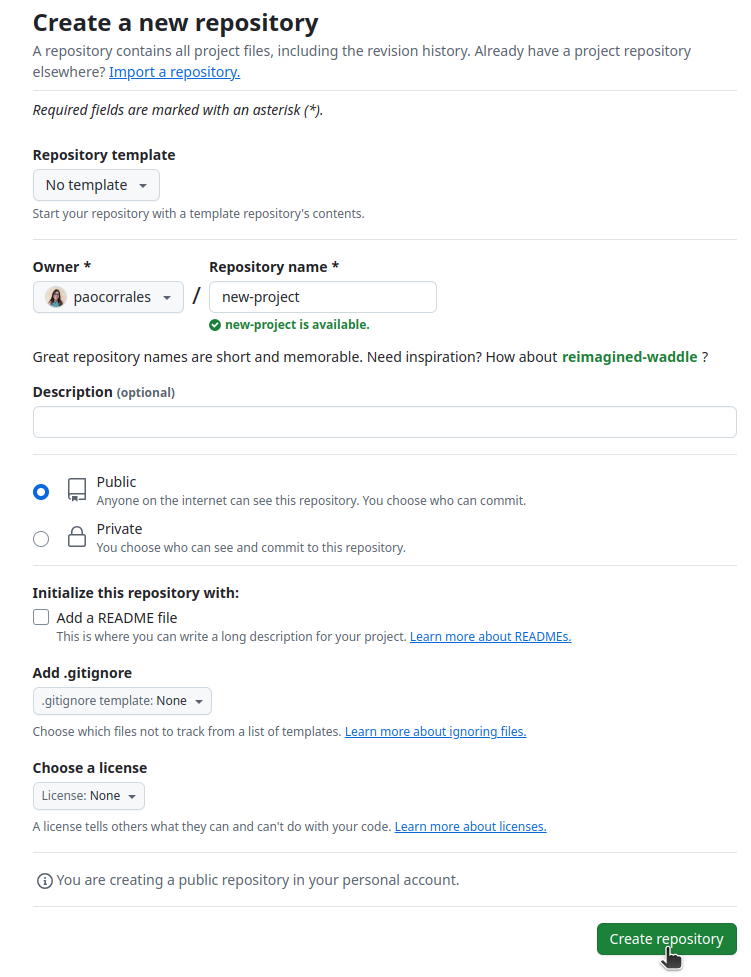
Fig. 3 GitHub interface.#
After doing that, GitHub will show you 3 different options to connect the new remote repo with a local one. Here we’ll use the first one.
Exercise
Connect the repositories
On the “Quick setup — if you’ve done this kind of thing before” section:
Select SSH
Copy the URL, it should looks like
git@github.com:<your username>/new-project.gitGo back to the terminal and run:
$ git remote add origin git@github.com:<your username>/new-project.git
Here origin refers to the remote repository.
Note
We use SSH instead of HTTP because is more secure and works in Gadi.
Now that we have the repos connected we can update the remote repo by pushing the local changes.
Exercise
Push changes to the remote repo
On the terminal:
Check the status of the repo, everything looks good?
Run
git push origin main
Go to the repo on GitHub and check if is now up to date.
Note
You can run git push --set-upstream origin main once to automatically push to “origin”. After that, running only git push will be enough and you will save a few seconds next time!
Remote changes#
Let’s come back to GitHub.
Click on “Commits” to see the history of the repository. From this view, you can explore the repository at the “state” of each commit and look at the file differences.
Now, we can try to make changes here.
Exercise
Create a README
On the main page of the repo on GitHub, click on the green bottom that says “Add a README”.
Add something to the file. READMEs usually are written in Markdown and contain information about the repo.
At the end of the page add a message on the first line and click on “Commit new file”.
Come back to the main page to see the README.
The new file and the changes you do on GitHub are only on the remote repository until you make a pull from the local repo. If you make changes on the local repo while it not up to date, you may encounter merge conflicts, which lead to headaches. This happens when the version of a file on the local repo is not compatible with its version on the remote repo. In those cases, git cannot decide which version is the right one and you have to do it yourself.
To avoid this problem (most of the time), you should do a pull before start doing anything else.
Exercise
Pull remote changes to the local repository
On the terminal:
Run:
$ git pull
The remote changes will be compared with the local version and you will see something like this:
remote: Enumerating objects: 4, done.
remote: Counting objects: 100% (4/4), done.
remote: Compressing objects: 100% (2/2), done.
remote: Total 3 (delta 0), reused 0 (delta 0), pack-reused 0 (from 0)
Unpacking objects: 100% (3/3), 967 bytes | 967.00 KiB/s, done.
From github.com:<username>/new-project
   c9cc95e..f42912c  main       -> origin/main
Updating c9cc95e..f42912c
Fast-forward
 README.md | 3 +++
 1 file changed, 3 insertions(+)
 create mode 100644 README.md
Try running
git pullagain, if you get a “Already up to date.” it means that the local and remote repos have the same exact version of the files. You are ready to continue working on your project!
Now you know the main and most important command to work git. In the next section you can learn go to work with a team or maybe how to contribute to a project. This includes the concepts of branches, forks, pull request and more.
Warning
While you can put anything on a repo, there are limitations.
GitHub allows individual files of up to 100 MB, so for any file below that limit can be safely included in your repository. If you have many moderately big files, you might be reaching GitHub’s soft limit of around 5Gb per repository.
Most important, adding big files to a commit can make things go slower. For that reason, we recommend that you don’t add data files to the repository unless they are small.
Tip
To avoid adding file to a repository, maybe because they are to big, maybe because you don’t have permission to share them, you can add a .gitignore file. This file will include the list of files and folders you want to ignore. This repo includes a collection of gitignore templates you can use.
Exercise#
Let’s practice the workflow one more time. This time, let’s assume you are working with others. Someone else has created the repository and given you permissions to push changes. This is one way to collaborate with others, and in the next session we talk about other workflows.
To start working, first you need to clone the repository to your computer. After that, if you have write access to the repo, you can add files or change the content of the files, commit them and push the changes to the remote repository.
Commands
git clone <repo URL>to clone a repository, regardless of whether it is yours or not. This command will download the repository to the current folder in your terminal.
Time to practice everything.
Exercise
Note: You will be able to complete this exercise only if you are a collaborator in this demo repository. If you are not, please open an issue in the repo asking to be added.
Clone the repository to your computer.
Create a new text file called
your_name.txt(e.g.Lisa_Simpson.txt). It can be empty or you can write something in it.Add the file to the staging area.
Commit the file with a descriptive message.
Just in case there are new files in the remote repository, pull remote changes to your local repository.
Push your changes to the remote repository.
Check the repository on GitHub. Is your file there?